Preparing Your Hemp Twine
How to choose the hemp twine for your bracelet and cut it to the right size for your wrist.
Hi, and welcome to Hemparadise. If you are viewing this tutorial, chances are you are new to hemp jewelry and would like to learn how to make your own pieces. Well you are in the right place! This is the first tutorial in Hemp Jewelry Basics, and if you have never made a piece of hemp jewelry before then you must start here to prepare your hemp twine before you can make your first hemp bracelet.
I’ll stop talking and get started. First you need to have an idea whether you are going to make a bracelet or a necklace and what you want it to look like. You need to know what you want to make so you can pick the right materials for the job. For this tutorial we are starting a basic hemp bracelet, but it doesn’t really matter because you start a necklace the same way you start a bracelet, so this tutorial will work for both.
Picking Your Hemp Twine
You need to pick what kind of hemp twine you are going to use. Here is a really quick rundown of the different types of twine available. There are different sizes of thickness, they are identified in lbs, as in how many pounds it can hold before breaking. The higher the number in lbs, the thicker the twine. You can even find different colors of hemp twine, our store sells black, red, orange, green, yellow, purple and white along with the natural brown twine. Chances are, if you are a beginner, you are going to be using the most common 20lb natural color twine. That is just fine, your bracelet or necklace will look great with the classic look. In the pictures and video I use for this tutorial, I am using 20lb white twine, so your bracelet should look almost the same as mine but more brown. All of the instructions I give you will be based on 20lb twine so that you end up with a great looking piece.
Cutting to Size
Now that we are done with the prep work, we can start getting into the meat of this tutorial. You will need two pieces of twine to make a bracelet or necklace. We will call them the core piece and the braid piece.
Core Piece:
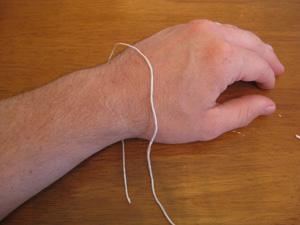
The first piece hemp twine you need to cut is going to run through the middle of the bracelet or necklace to create strength and keep the piece together. It needs to be a little more than twice the length that you want your final piece to be (you will add a few inches for the end knots).
Here is the best way to do it:
- Loosely wrap the end of your twine around your appendage (your wrist for a bracelet, your neck for a necklace).
- Add two more inches and then pinch that spot between your fingers so you don’t forget where is was.
- Double the length of the twine by folding it where you pinched it and then cut it to be that length.
It is also good practice to make sure you have more than enough twine so that you have plenty of room to work with. Its ok to have too much because you can cut it off later.
Braid Piece
This piece is what is going to be braided into the pattern used for the bracelet or necklace. In most cases this piece is going to be 3 times the size of the core piece. But, if you are going to use different sizes of hemp twine, you will need to use different amounts: thicker twine – use shorter length; thinner twine – use longer length.
This part is simple:
- Choose a new piece of twine and pinch it at the same length of the core piece.
- Fold new piece twice at the length you pinched it and cut it to that resulting length.
This should give you a length of twine 3 times the size of your core piece.
How that you have the two pieces you need, you can start making your hemp bracelet or necklace! Make sure to check out the next tutorial on how to start your hemp bracelet or necklace.
Thanks for reading,
Sam A. @ hemparadise.com
P.S. If you still need some hemp twine to get you started on your new hobby, make sure to check out our store by clicking the link above or you could just click here too.