Basic Square Knot Hemp Pattern
Hemp Bracelet Pattern no 1:
The basic square knot hemp bracelet pattern
Previous Lesson: Starting a Hemp BraceletNext Lesson: Finishing your Hemp Bracelet
Here we are! The first actual braid pattern for your hemp bracelet. The square knot braid is the most basic hemp bracelet pattern which is also used most often. This is a great place for beginners to start learning the skill of braiding a beautiful hemp bracelet and also the experienced hemp artists who want a refresher to keep their work looking great.
If you have put up with my endless banter this far then you really must be committed to learning how to make a great looking hemp bracelet. I will try to keep your reading time to a minimum and skip any useless rambling like what I am doing right now. That way you can get to learning the skills you want and not waist time reading pointless paragraphs like this one.
The square knot hemp bracelet pattern I’m going to teach you is a braid that is very versatile and can be used to make so many great looking pieces of hemp jewelry. It is not only good for making bracelets, it looks great as a necklace or choker too. I will also show you in a later post how to add beads to this basic braid so you can really customize it. Make sure you know how to make the beginning knot before you try this braid.
Here are the steps for this simple braid:
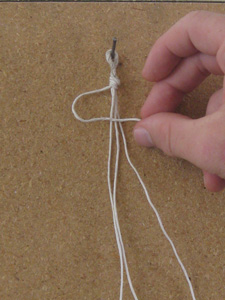
Step 1: Over
With the shorter core piece down the middle, take one side of the long braid piece and make a loop with it that overlaps the short core piece in the middle.
Step 2: Over
Now take the opposite long side and make sure it overlaps the side that you made into a loop.
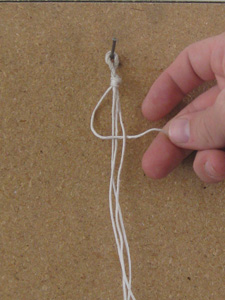
Step 3: Under and Through
Now take the same side that you have put over the loop and thread it under the middle core piece and up through the loop you made in step 1.

Step 4: Tighten Knot
Once it is slid through the loop, you tighten by sliding the knot to the top and pulling both ends.
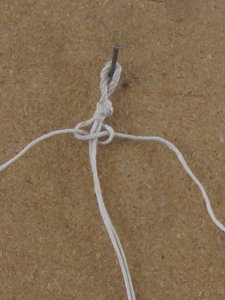
When you tighten the knot, pull as far up as possible and pull pretty tight. You want to make sure it is tight enough that there are no spaces in the knot. You want your first knot to look like this:
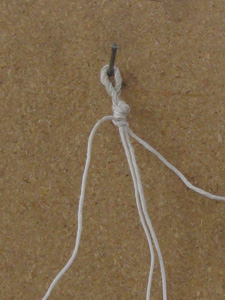
Did you notice how I named each of the steps? Memorize the names of the first three steps and then turn it into a chant. This will help you remember the hemp bracelet pattern. It goes like this: Over, Over, Under and Through.
Now repeat this chant till you can’t forget it:
Over, Over, Under and Through
Over, Over, Under and Through
Over, Over, Under and Through
Over, Over, Under and Through
Over, Over, Under and Through
Is it memorized yet? Good, now you will never forget this pattern.
Keep reading, you aren’t done yet!!!
This hemp bracelet pattern is an ALTERNATING pattern. That means that every other knot needs to be a mirror of the steps above. If your loop was on the left, do the next loop on the right. But make sure that you keep following the Over, Over, Under and Throughpattern. If you don’t alternate the knots then you will get a different pattern than what I am trying to teach you in this lesson.
Now keep on following these steps while alternating the sides. Very quickly you should start to see the pattern of the braid. It will look something like this:
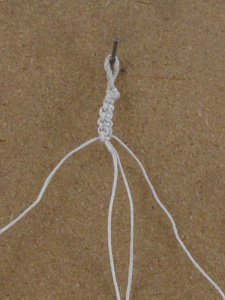
Keep repeating the hemp bracelet pattern until you reach a point that you think it acceptable. I usually stop when I think all but one inch around my wrist is braided. But it is mostly up to you and what you prefer for your bracelet. You MUST make sure to stop braiding before you run out of twine because you need to tie a few more knots to finish up, which you will learn in the next lesson.
Great job! You can now braid a basic square knot hemp bracelet pattern. Remember that this pattern will also work for necklaces, just make it long enough to fit around your neck.
The last step in your learning will be finishing the hemp bracelet. Keep watching for that lesson, it will be coming soon along with some other hemp bracelet patterns.
Thanks for reading, and make sure you check out our hemp jewelry store for twine, beads, and inspiration. See you at the next lesson!
Sam A. @ Hemparadise.com
Previous Lesson: Starting a Hemp BraceletNext Lesson: Finishing your Hemp Bracelet
